Walkthrough Home | Dino Crisis UK | Forums | Products
Copyright notice: If you want to copy this walkthrough for your own site, please ask permission BEFORE you do so and place the following code on your site at the top of each walkthrough page:
For help with the game and using the controls, click here.
Once you've familiarized yourself with the controls, you're ready to start a new game......
For the first-time user, we'll be using the 'easy' setting. You'll get more ammo and the creatures will be easier to kill. However, be warned that the second time around will be much harder!
I've divided the walkthough into sections - each section is where you will find a new map for the game. There are no levels as such, so hopefully this will make things easier.
All screenshots and videos open inline. Videos are best viewed in landscape mode, so if you are viewing this wakthrough on a small device, such as a mobile phone, you can turn the device on it's side for better viewing.
Grab a pen and piece of paper - you will need it to write down the various codes you will find throughout the game.
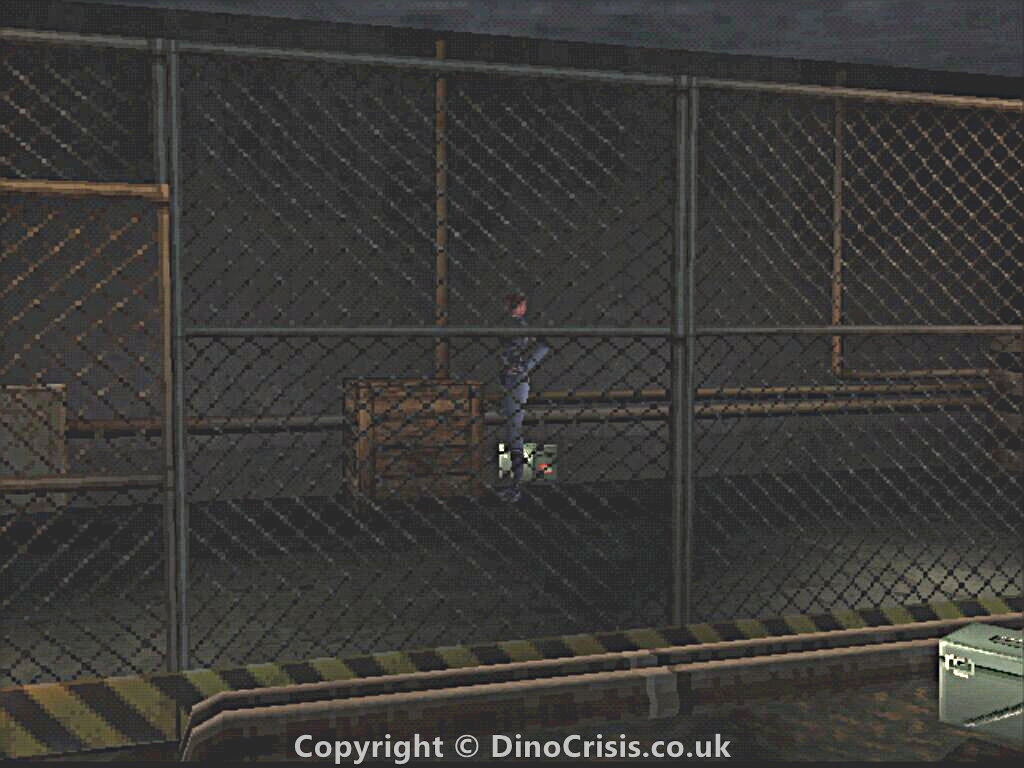
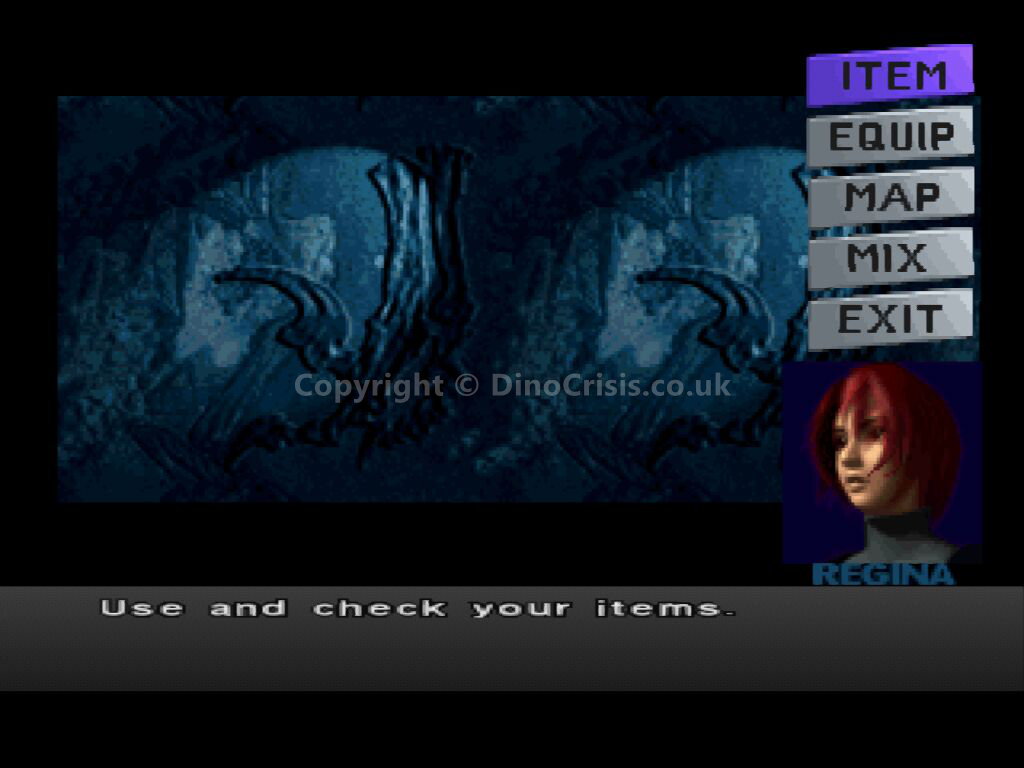
Okay, go ahead and fire up your game. Either watch the movie clips at the beginning of the game, or bypass them by pressing the 'Start' button on your controller. When the movie clips have finished you end up at the backyard of the facility, and there's some dialogue between the characters. When they've finished, walk round to the left towards Gail. After another cut scene Regina will stand facing the green double-doors. Ignore them for a moment and walk to Regina's left, around the corner. Push the large crate¹ on the right wall to find your first pickup, an An. Aid (screenshot). I'm not going to go into the ins and outs of items and how to use or mix them together, you can find all of this information in our forums . Suffice it to say, you can find settings to equip weapons, mix and sort items from the inventory menu accessed by pressing the circle button on your PS1 controller (screenshot). I strongly suggest you make as many poison darts as you possibly can, for later in the game!
Please note: I'm playing the game on my PC, so some of the items may differ from the ones you come across. I've played this game many times and items are sometimes in a different place, or they are not there at all in some areas. Please bear with me as I'll list the items as I find them - hopefully you'll find them all or even more.
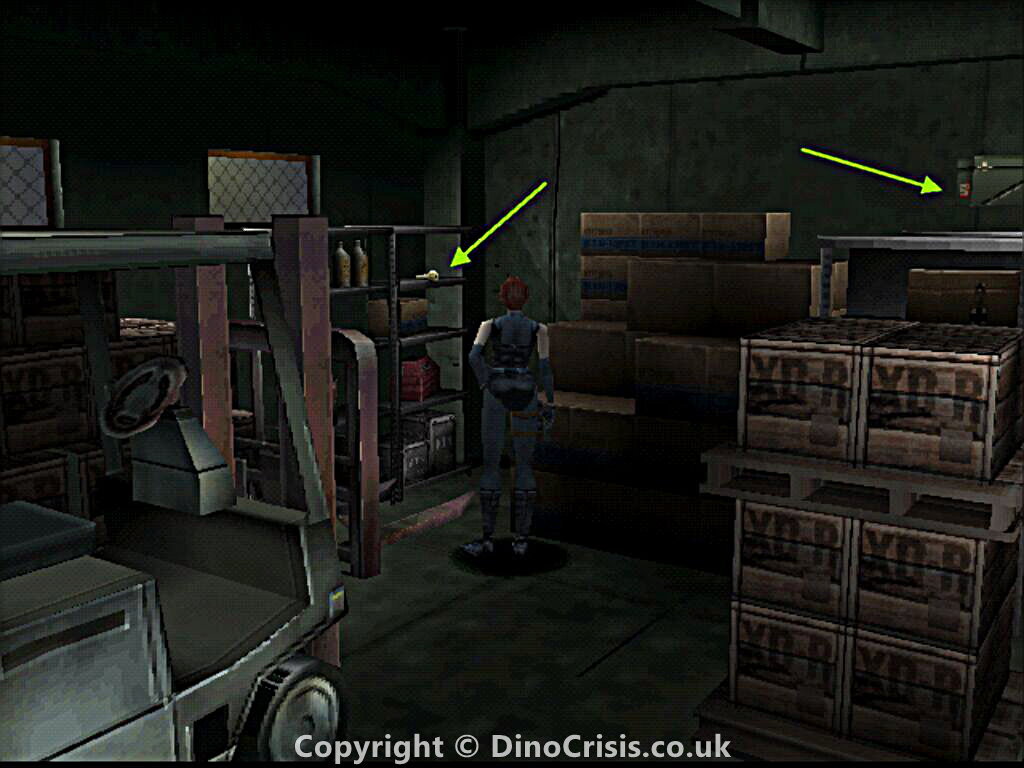
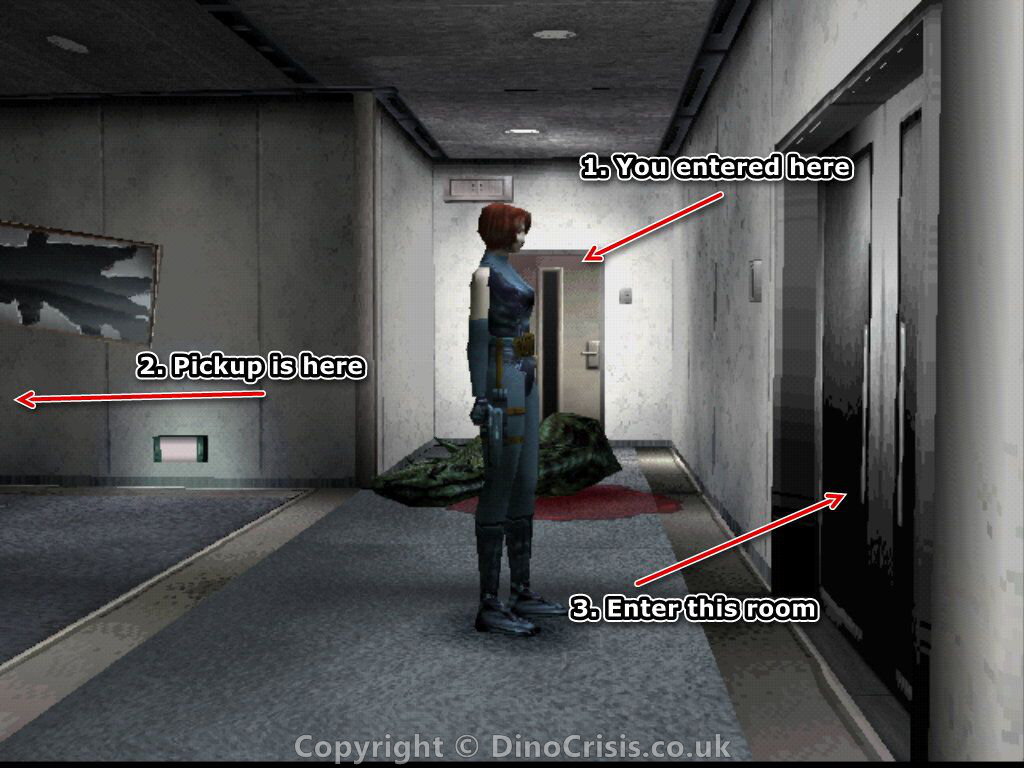
After your pickup, walk back to the green double-doors near Gail and enter by going up to the doors and pressing the 'Action' button on your controller. Inside, walk forward and you'll see two items you can pickup (screenshot). One is the BG Area Key (backup generator) on the left which you can pick up by walking close to it and pressing 'Action', and a resuscitation on the right. You need to push the shelves out of the way to reach it.
Leave the room and walk to Regina's left, as if you were going back out of the metal gate where you first entered. Another cut scene shows Gail taking the key away from Regina. He then leaves through the gate and you must follow him. Once through the gate, turn right and go through another gate. Follow the path until you come to Gail kneeling over a body. After another cut scene, search the body by standing close to it and pressing 'Action'. After you have picked up the Med Pak M continue along the path.
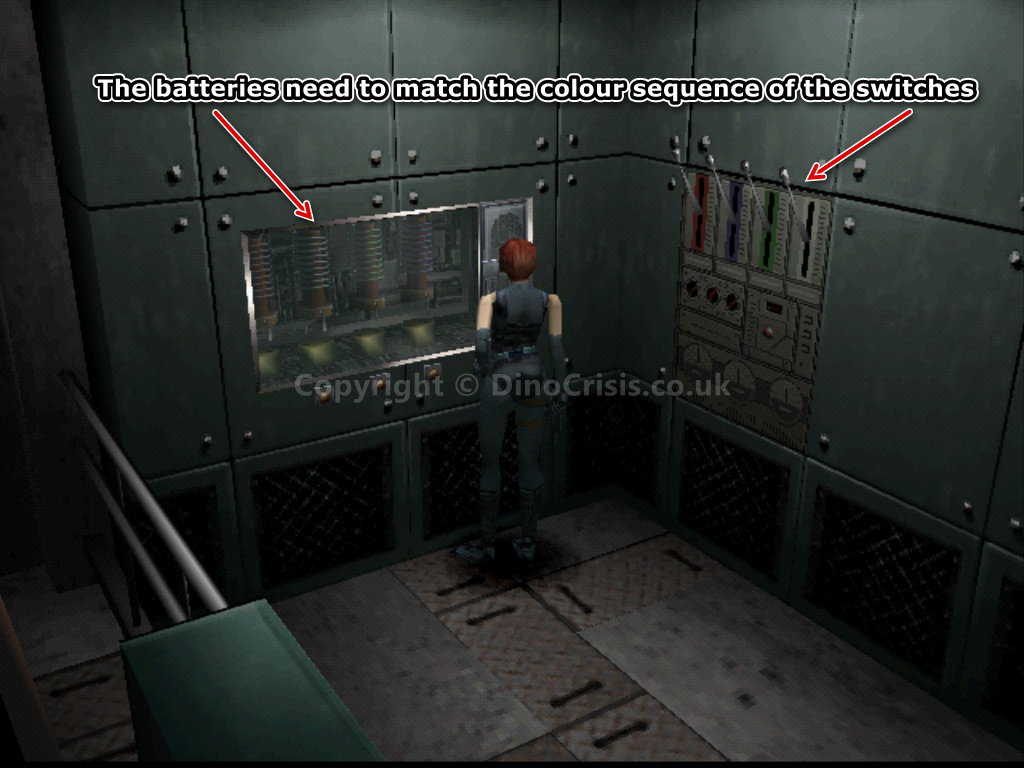
You come to another building that holds the Backup Generator Room 1F, with Gail standing outside of the door. Enter the door and follow the passageway until you come to a series of switches next to some batteries (screenshot). The colour sequence of the batteries must match the switches. Move the batteries by getting close to the buttons and pressing 'Action'. Move 'Right, Centre, Right' to get them in the right order (red, blue, green, white), and then cancel to come out. Move to the switches and press 'Action' to pull them all down.
Return the way you came to the door - there will be a small cut scene where you hear some disturbing noises! Go back out of the door if you dare! Another cut scene follows. Regina discovers that Gail has disappeared, and there are signs of a violent struggle leading to a hole in one of the fences. Regina shouts for Gail, attracting the attention of something that charges towards her! Regina is shocked to see a medium-sized, lizard-like creature, remarkably like a dinosaur, just about to attack her!
After the cut scene has ended, press 'R1' to aim and 'Action' to fire your weapon. If you are playing the game in easy mode, 3 or 4 shots of the handgun should be enough to drop the creature² (Video). After it's down, make your way back to the facility. After another cut scene where Regina explains to Rick what has happened, he tells her to come to meet him in the control room. A map appears to show the way.
Go straight ahead to the door leading to inside the facility and follow the passage. After bit of a scare, you find yourself near a notice board³. You can read it if you like, but it's just a memo about a lecture to be given by Dr. Kirk. Carry on to the broken grating lying on the floor. You can climb up into Piping Check Passageway A 1F and follow the passage. There are actually two openings down through which you can drop, but climb down through the first opening to find yourself in the Control Room Hall. Follow the passage to a door. This is where you'll find Rick, but if you go a little way past it you will find some 9mm Parabellum ammo and a Green Emergency Box on the wall. This is one of a number of emergency boxes you will find throughout the game. Click here for more information on these and what they contain. You can store your own stuff in these as well as discover things you may find useful, such as ammo or medical supplies. However, you don't have any plugs at the moment, so you can't open it just yet.
There are some metal gates further on around the corner, but you can't open these, so go back a few steps to the door you just passed to find Rick hacking into the security system. Rick tells Regina to go and find Dr. Kirk while he works on opening up the rest of the facility.
Back in the control room hall, go back the way you came, but instead of climbing back up through the vent, go through the door at the end to find yourself in the Management Office. This is actually a save point, so you can save your game before you leave the room. Walk forward to the switch near the opposite door and press it. This turns on the computer near the first door. Go to the computer and read the email showing on the screen. This explains about the DDK discs and how to use them.
Grab the spinning disk you see on the cabinet. This is the DDK Input Disk H. The box next to it contains the first plug. Grab it to use on an emergency box4. Head into the other room near the computer that you just activated. You see a dead body. Search it to find the Panel Key 2. Notice the flashing indicator on the large safe? You would normally have to come back here after finding the code, but I'm feeling generous so I'll just give it to you. :) To open the safe, input: 0426. The safe opens and inside you can find the Entrance Key and a resuscitation.
Leave the room and turn left to go out of the door near the flashing switch. I strongly advise you to save your game here! Once you leave the room, Rick will contact Regina to tell her that she can now access the switches to turn off the lasers near her. As soon as they finish talking, another dinosaur appears. You can either turn off the lasers, run through and turn them on from the other side to get the creature from a place of safety, of you can just go for it! Either way, it shouldn't take too much finishing off (in easy mode). Once that's done, pass the creature to the Locker Room door before the turn in the passage. Go through it.
Inside thoroughly search the room. You'll find the DDK Code Disc H, an An. Dart M and a journal of the guardsmen on the table. You'll find some miscellaneous information and the code for the weapon storage in the custody room: 0426.
When you leave the room, there's another door along the right-hand passage, but you can't access it, yet. If you want to save your game before you carry on, then do so, otherwise go past the lasers and through the door. You now find yourself in the Main Entrance to the facility. Regina has a good look around. There's the main entrance door to her left, and a staircase to the right. Go through the door to the outside of the facility.
Once outside, you may think that Regina could walk to the right and over the grass, but she can't. You have to walk to the left and follow the path right around the grass to reach the body at the other side. The reason for this detour will become apparent later in the game. Pick up the SG Bullets and search the body to find the DDK Code Disc N and a personnel file. Read it and take note of the name and registration number you find: Mark Doyle, 57036.
Go back the way you came and back into the main entrance. Search the room and you should find a Med Pak M and two An. Aids (one behind the stairs).
Walk up the stairs by standing in front of them and pressing 'Action'. At the top, turn right and push the large container out of the way to retrieve the An. Aid. There may or may not be another pickup nearby if there were only two downstairs instead of three.
Go through the door at the end and arm yourself for another raptor! Sometimes it's just inside the door, sometimes it's out of view. I tend to stand just inside the door and wait for it to charge. Once that's down, go and pick up the SG Bullets to the left of the entrance doorway (as you are facing the door).
Down the passageway and outside is the Communication Antenna Room. A memo on the top gives a bit of info on the DDK locks and the code to the weapons storage locker in the lounge: 8159. There's nothing else you can do out there as the door at the other end is locked.
Once you have the code, go back inside and through the Lounge door on the right to blast yet another raptor!5 (Screenshot.) To the left of the door (probably where the raptor fell) is a resuscitation, and to the right, a Hemostat.
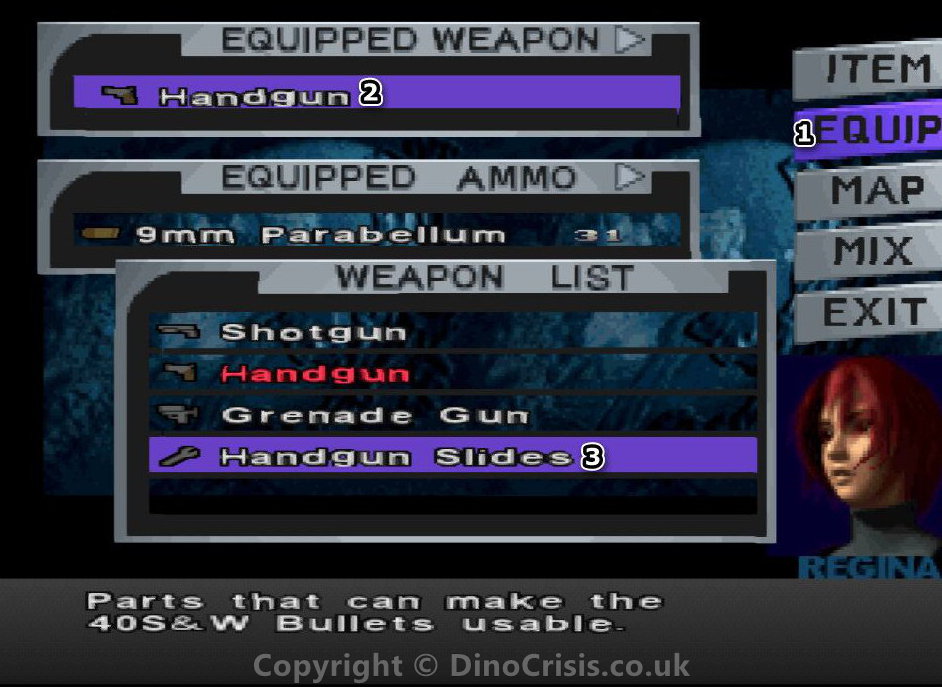
Walk through to the bar area. On the counter top is a Chemical Manual that tells of the different chemicals that can be mixed together to make other stuff. To the left of the bar is a safe on the wall. It can be opened with the code: 8159. Inside are some Handgun Slides. You can equip the handgun with these to make a custom weapon (screenshot).
Leave the lounge. Go towards the Chief's Room opposite and set the DDK H combination. The code is: HEAD. Inside a brief cut scene finds a member of staff, barely alive. After a short conversation he hands Regina the Panel Key 1 before he dies. This key goes with the panel key you found earlier.
In the corner of the room, to the left of the body, are some SG Bullets. Pick them up and make your way around the room to the panel set in the wall near the window. Before you open the panel, pick up the DDK Input Disc N. Now to set the panel keys. Stand in front of the panel and go into your inventory and select each panel key. If you look closely at each one. you'll see a clue to the codes you need to enter. :) The full code is: 705037. Inside is the card to Dr. Kirk's secret lab, Key Card L.
As you walk away from the panel, you will receive one of the biggest scares in the game! A huge T-Rex comes crashing through the window, grabs the dead man and then turns to Regina! Wait until the creature's head is actually coming towards you, mouth open, before you shoot (video). You should only have to do this three or four times before he gives up and walks away, leaving Regina staring after him in shock!
Once you've calmed down, make your way back downstairs to the main entrance. Go behind the stairs towards the door at the back. Rick contacts Regina to tell her to make her way to the training room as he's seen something strange on the monitors. Set the DDK N lock near the door with the code: NEWCOMER.
If you don't want to do all of that again, you can make your way back to the management office to save your game before continuing (be careful, as there is a chance that there may be another raptor outside of the management office door). Go through the doors that you have just unlocked and into the Elevator Hall, where you will see a map on a transparent screen in the middle of the room. It's a map of the 1F and 2F floors. Walk around to stand in front of it and press 'Action' to save the map data.
¹To push boxes, crates, shelves etc., just walk up to them and keep walking against them until Regina pushes them out of the way
²Once the creature has fallen, if Regina still looks at it when she turns away, then it's not dead. Fire another shot into it and that should finish it off. When you see a large pool of blood oozing out of the animal, and Regina looks away from it, then you know it's dead. Please bear this in mind when dealing with other creatures as you make your way through the game.
³At this point, you should know that every notice board, book, piece of paper, computer etc. that you come across may contain vital information. Read everything!
4I'm not going to tell you what to use the boxes for, I'll just tell you where they are. You can store things from your own inventory in them and/or take supplies from them for yourself. It's up to you how you use them as you may use more or fewer resources than I would myself and you may not even need anything from them.
5You could run past the first creature, but they are very smart and can open doors, so you may find yourself dealing with two of them if you do that.
I hope you find this guide useful. If you would like anything clarified, or would like to comment on this or anything else, please post in our forums or contact me here.