DINO CRISIS WALKTHROUGH FOR PLAYSTATION - LAST UPDATED JULY 2019
Walkthrough Home | Dino Crisis UK | Forums | Products
Copyright notice: If you want to copy this walkthrough for your own site, please ask permission BEFORE you do so and place the following code on your site at the top of each walkthrough page:
SECTION FOUR
As you enter the next section, you can hear the sound of raptors, but they are thankfully trapped behind some lasers, so you should be able to get them from safety. Around the corner are some double-doors, but just ignore them for now and continue on. Deactivate the next set of lasers and then follow the passageway to another Red Emergency Box by the door to the Computer Room. In that room is a plug and an An. Aid. The plug may come in useful if you couldn't open the emergency box you just passed - it's well worth opening! This room is another save point.
You can read the file on the desk which explains how to open the next DDK devices. There's nothing else to do in here just yet, so you can go through the door at the other end of the room from the first one. Once in the Research Area Hall, you hear the sound of raptors trapped behind some lasers. You can open the first set as they can't get you, yet. The next door you come to is the Research Meeting Room.
A whiteboard on the wall explains how to mix and neutralise certain gasses, which may come in useful. On the shelves next to it is a plug, and the terminal in the middle of the room shows a code to unlock the experiment room: 7248. You can also find the DDK Input Disc E. There's a journal on the top of the counter that talks about Third Energy and how dangerous it is. It also speaks of a secret lab belonging to Dr. Kirk, a clue to which can be found in the library room.
Leave the room and turn right to go back to the computer room. Next to the yellow file is a terminal. Enter the code you just found in the research meeting room: 7248. This unlocks the door back in the research meeting room, so make your way back there and enter the door at the back to the Gas Experiment Room. Inside, you will see a researcher trapped in a chamber full of deadly gas! The console in front of the window has buttons that allow you to mix the gasses to either a higher toxicity or to disperse them altogether. You need to press the following button in the correct order. Don't worry if the gas rises a little at some point, it will still work:
RED
GREEN
BLUE
GREEN
BLUE
RED
Once the gas has been cleared, enter the gas chamber and walk towards the dying man. He's obviously confused, but he hands Regina a B1 Key Chip with a code written on it: 3695 and tells her it will gain her access to Dr. Kirk's personal lab.
Search him for the Small Size Key for the emergency case you couldn't open earlier. If the man had died from the gas before you entered the room, you wouldn't have been able to get this key, but you would still get the key chip.
As you go to leave the chamber, a hungry raptor makes a grab for you! Do your stuff when the DANGER sign flashes, and Regina will escape, leaving the dino trapped in the room. You could just walk out and leave it, but I usually fill up the room with gas to get rid of it.
As you leave the research meeting room, turn left and walk round the corner. There's a Green Emergency Box that requires two plugs, and another set of lasers with two raptors trapped behind them. Get rid of them, or run past them2, and make your way to the Library Room3. Just inside the door is a Med Pak M.
As you go forward, there's a notice on the wall with nothing interesting written on it.
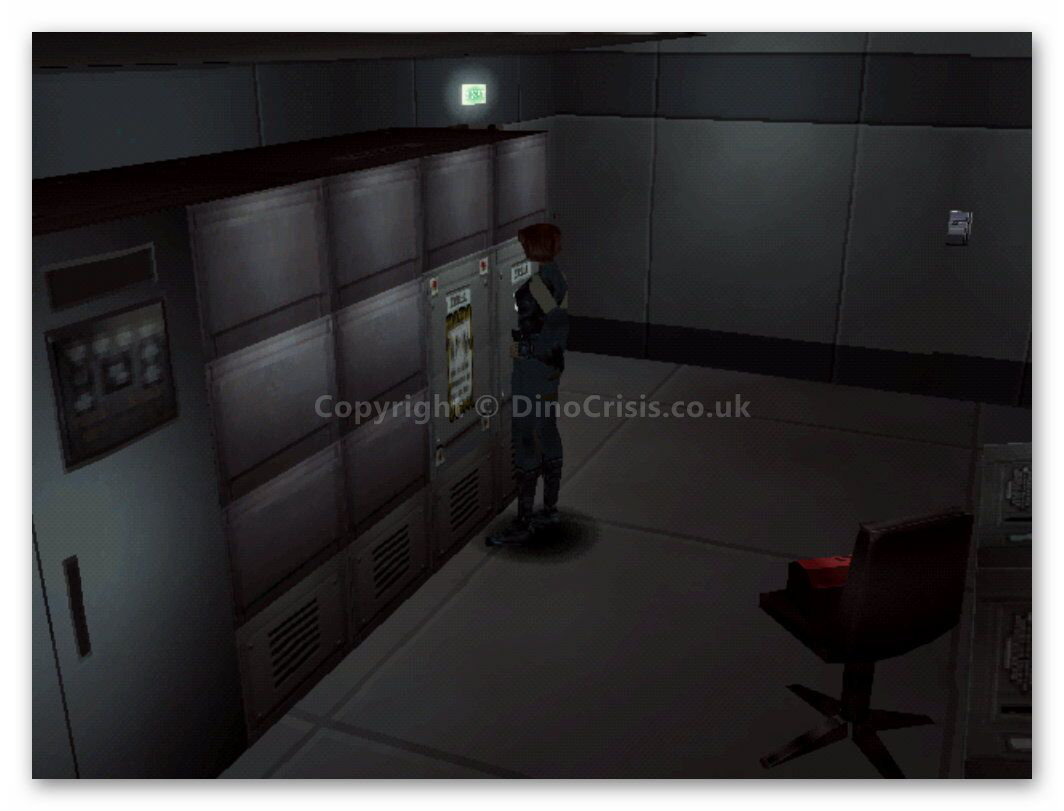
As you enter the door, turn right and go to the other side of the room to find another computer terminal set in the wall. Use the B1 key chip and input the number written on it: 3695. Now you have to solve the puzzle (screenshot). It's fairly easy, and you're smart enough to figure it out yourself. (Video) :-P
Once the puzzle has been solved one of the lockers will light up to indicate which one has been unlocked. Walk down the middle aisle and you'll find the Handgun Sights. Don't forget to equip your handgun with the new hardware! Walk down the next aisle to the locker with the green light. Use the key chip to open it up to find the Key Card R. You'll also find a memo saying that the card is needed to enter Kirk's secret lab, but can't be used on it's own, another is needed, and you now have them both.
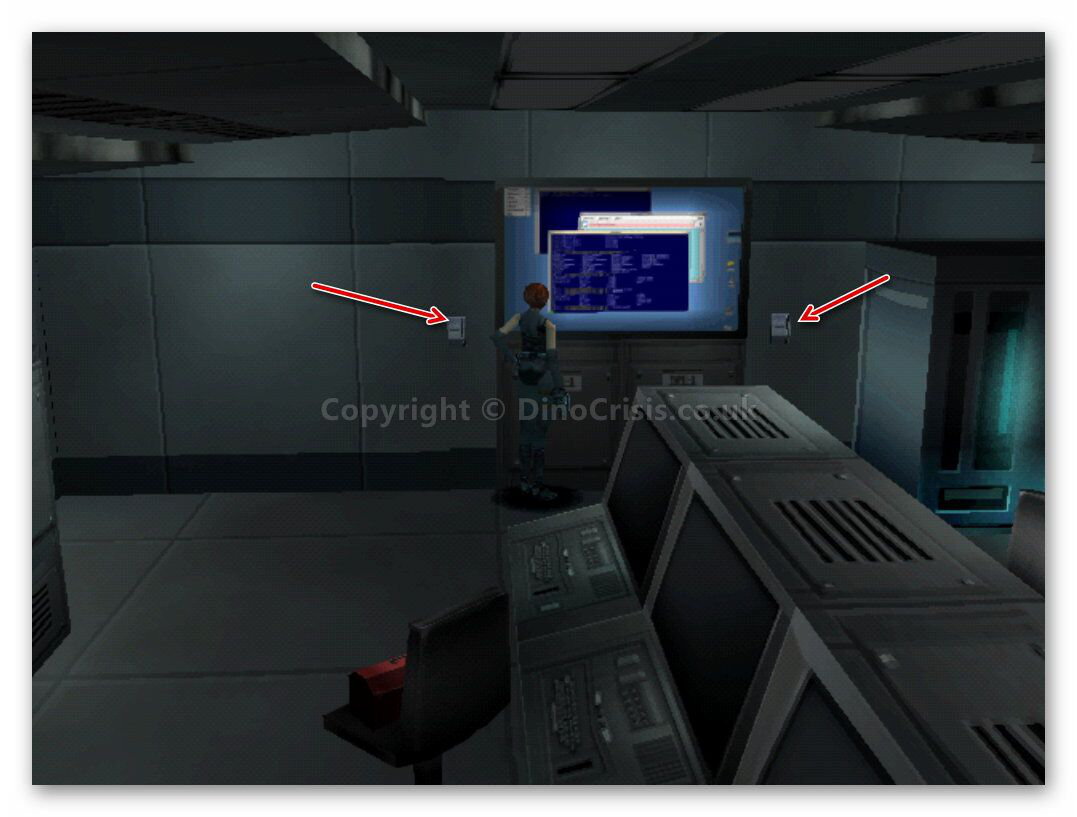
Make your way back to the computer room where you'll see a large monitor on the wall, linked to a supercomputer. At each side are key slots (screenshot). Stand in front of the left one and use the 'L' key card on it. You won't be able to do this by yourself, so Regina will call Gail for assistance. Working together, you insert the keys, and now you need to set the DDK lock to the right of the door that has been revealed. The code is ENERGY.
Enter the Experiment Simulation Room, and, lo and behold, there seems to be a simulation running at that very moment. It soon stops and Regina has a chance to have a look around.
In one corner is an An. Dart L, and behind the shelves at the other end of the room are some Shotgun Stocks. You also find an emergency evacuation hatch, but it's securely locked. On top of the simulation terminal is a journal that mentions an 'Initializer' and a 'Stabilizer'. It also warns about the danger of Third Energy. You'll also find a hint to 'giant creatures' that emerged just after the experiment!
As you re-enter the computer room, you find that someone has initiated a lockdown procedure! Gail suspects Kirk of causing it, but now you need to find a way out.
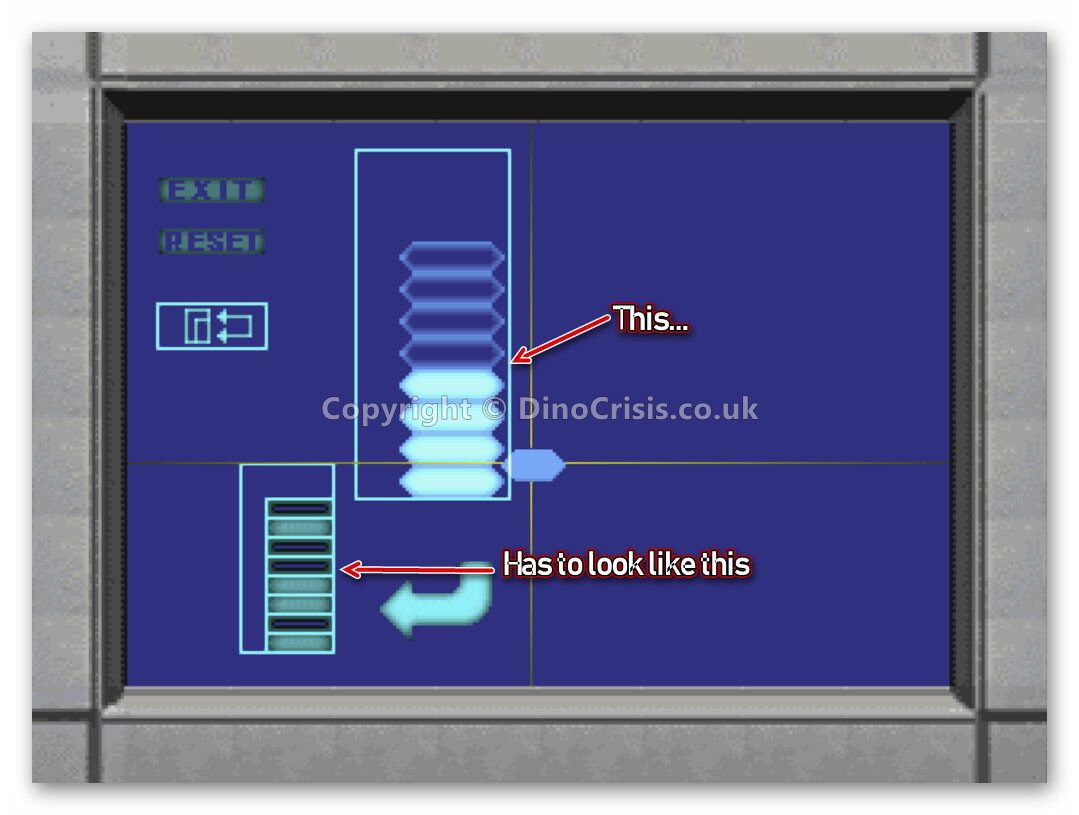
Walk around the desk and remove the screwdriver from the red toolbox on the chair and stand in front of the panel on the wall (screenshot). You need to select the screwdriver to open the panel and then solve the puzzle inside. You need to set the top three circuits so they make one, full circuit, like the picture at the bottom-left. It's very simple - turn number three to the right once and set it. Set the first one without turning it, and then turn the middle one to the right once and set it (Video).
Cue another cut scene - the doors are now open, but you only have a short time to escape before total lockdown. You will be faced with two choices; you can either go with Gail and blast your way out, or you can take the slightly safer route and go with Rick. Gail's will be faster, but it's up to you which option you want to choose.
Gail's Method
Once you select to go with Gail, you will have to make your way through the raptor-filled hallways and rooms, but quite honestly, it's fairly easy to save ammo and just avoid the beasts. As long as you save your game before you leave the room you can just re-load if you cop it!
Run out of the room, killing the two raptors if you can't get past them. Enter the library room, where you'll find another couple of creatures, but it's quite easy to get past them; simply run around to the next door and exit quickly! Continue on until you reach the main hallway B1 where there's another raptor, but you can outrun him. Go through the shutters on the right, turn left and run to the hallway for carrying in materials.
A rather long cut scene shows you that Gail has finally caught up with the elusive Dr. Kirk. Gail threatens Kirk at gunpoint and he hands Regina the key card she needs to call the extraction chopper to come and rescue them all.
Gail then leaves Kirk in Rick's care and walks off to complete some 'unfinished business'.
Rick's Method
As you've probably guessed by now, Rick is a more cerebral personality, so his method will involve far less shooting than alpha-male Gail's method. However, although you won't encounter as many beasts, you may want to think twice about this method. Before we go any further, you will likely need a pen and paper ready for the next puzzle.
Go back into the experiment simulation room, saving your game as you go. Go right around to the console next to the emergency escape hatch. Activate it, and Rick will radio through to say that he can force the console to display the correct passwords. Several cards will appear on the screen - they will flip periodically, leaving one letter showing before that one disappears. Whichever letter is revealed, write it down. You are only allowed two mistakes before you will be forced to escape Gail's way! The password reveals get tricky, so keep a close eye on the screen.
Once you've entered the passwords correctly, escape through the hatch. You end up in the the hallway for carrying in materials, and a cut scene ends with Kirk being threatened by Gail at gunpoint and forcing him to hand a key-card to Regina so she can call for the extraction chopper.
To Continue
You need to make your way back to the control room. Go by way of the medical room hallway and pop into the medical room. Now you can open the small boxes in the next room by using the small key you found. Inside the boxes should be a resuscitation and and Med. Pack L. Be sure to look twice, once for each box.
Outside of the medical room, turn left, go up the stairs and enter the control room. At the back of the room is an elevator. You can now access it using the key-card you received from Dr. Kirk. You will end up in the Communication Room. On the floor you will find some Slag Bullets, and there's a Red Emergency Box on the wall.
On the wall next to the other door in the room you'll find an box with the Antenna Activation Key inside. Take it. This room is also a save point, which you will definitely need, so please, please save your game now, right now, okay!!!
You now find yourself in the Passageway To Communications Tower. Follow the passageway until you come to two doors. The door on the right leads back inside, near the Chief's room and the lounge. You can ignore that and enter the left-hand door to the Communication Antenna Room. A memo on the top gives a bit of info on the DDK locks and the code to the weapons storage locker in the lounge: 8159 (if you don't already have it).
You'll also find a slot for the antenna activation key, so use the key in there. Regina activates the antenna (making an awful lot of noise, don't you think??). Now comes the hard part...
Once you leave the room, the ground will start trembling and the doors will lock. The trembling is caused by our friend, the T-Rex! He spots Regina and she tells Rick to do something about the doors. The T-Rex makes a grab for Regina, knocking her down! Once she's up, there's only one way she can run, back down the long passage to the communication room. Timing is everything! If Regina slows down, she's dead! Near the door, Regina is knocked down again. Quickly get up, spin around and fight the T-Rex as you did before - shooting only as he comes towards you. After doing this a few times, Rick tells Regina the doors are open again. Quickly turn and enter through the doorway as fast as you can!
Once safely inside, Regina calls the chopper to come and pick them up. You now need to get to the heliport. As you make your way to the elevator, Rick contacts you to tell you to make your way to the heliport via the main entrance. At this point, I always go back to the management office to save my game, I can't go through all of that again!
Once outside the main entrance, you'll see why you can't turn right and go straight to the door at the other side. The place is teeming with pteranodons, and you have to run right around the grassy area to reach the Passageway To The Heliport. Once through the door, you'll encounter a couple of raptors, but you should be able to avoid them if you want to save ammo. At the end, enter the single door on the right, and cue another puzzle.
First of all, head for the metal ladder opposite and climb up, turn left and walk to the end to pick up some grenade bullets. (Some walkthroughs suggest you may also find the grenade launcher here.)
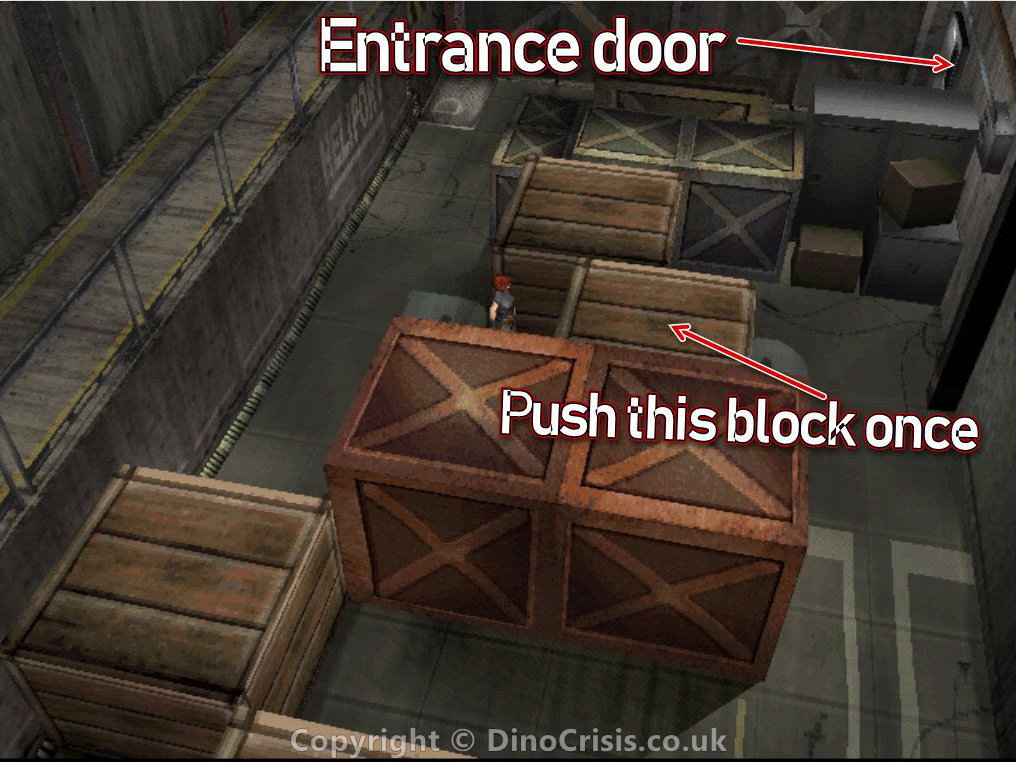
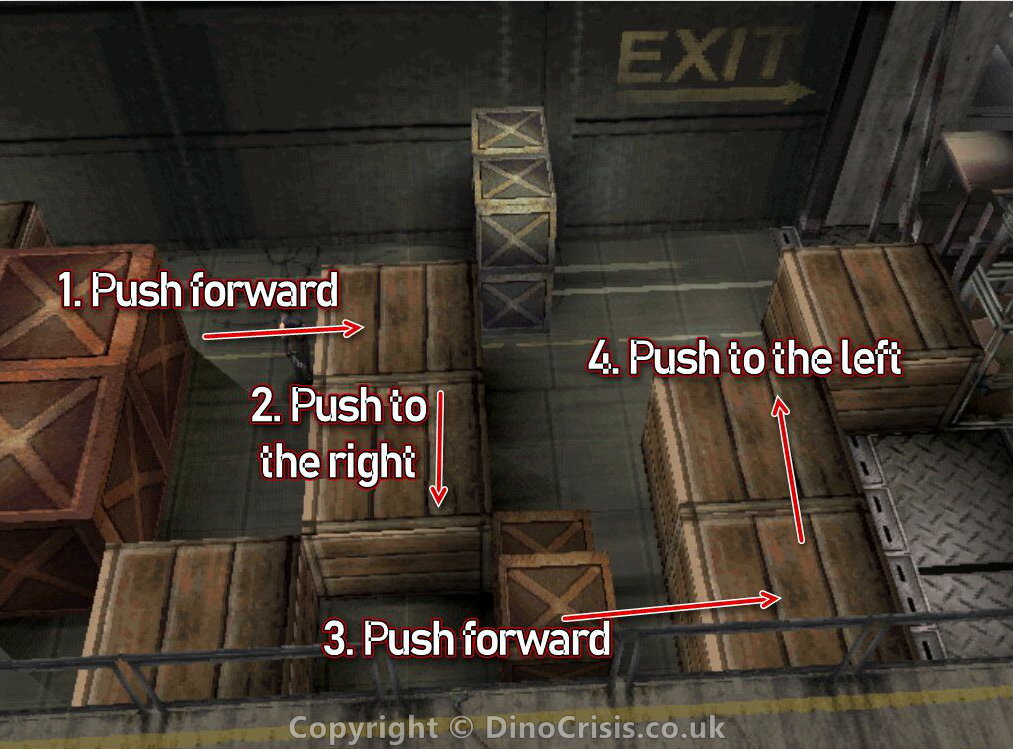
When you climb back down the ladder, you are in for another puzzle. As always, it's easy when you know how. At the bottom of the ladder, turn right. You'll see two smallish boxes. Push the second one forward (screenshot). Run around the same crate and squeeze through to the other side. You'll come to two more crates of the same size. Push the first one out of the way, and the second one to Regina's right. Walk to the next set of similar crates and push the second one forward and the first one to Regina's left (screenshot). You can watch a video here to see the exact sequence.
Once you are clear, walk towards the large exit doors and you'll see some more grenade bullets. Pick them up and prepare to go outside.
A very exciting cut scene, which you probably think heralds the end of the game, ensues. However, the helicopter that is on the way to rescue you and your team is taken down by the T-Rex! After the sequence ends, Regina is left outside while Rick tries to repair the broken elevator that you can see open in one corner of the area. Run towards the open door, and Rick, for some reason, tells you to get back out there while he repairs it!
All you can do is run away from the creature until Rick calls you over - run to the elevator and get inside, fast!
While chatting despondently with Rick, the elevator takes you to the Underground Passageway To The Facility. At the bottom, Rick goes on ahead and Regina is left alone, again. Walk forward and you'll see the rubble ahead disturbed as more little dinosaurs appear and gather around Regina. These are small, but they can cause some serious damage, so run forward and into the alcove on Regina's left. Enter the door to the Materials Room, where there are a few more tiny critters. At the other side of the room is another dead body. Search him for the C.O. Pass Card and a memo, which you do need to read before you can go any further. (You may or may not find and An.Aid in one of the boxes in there. Some walkthroughs say there is one.)
Leave the room and turn left in the main passageway to reach some doors. This is where Rick is. You tell him you've found a way out (that's why you needed to read the memo). This elevator takes you back to the large elevator. The card you found on the body allows you to use the elevator to get to the next lowest section of the facility, B3. You are now in Carrying Out Room B3.
1Interesting fact about the DDK passwords - they always start with the same letter as the DDK you are using at the time.
2Often when you evade the raptors, they follow you into other rooms as they can open doors. Unless you are trying to save ammo, such as on the normal game or the second time around on the easy game, you may as well get rid of them. Also, sometimes when I play this there is only one raptor behind the lasers, and one could be in the library room, or not. Just take care!
3If you happen to visit the library room when you first enter this new area, before you go into any of the other rooms, a raptor is likely to attack when you enter the room, so be prepared!